Kursus Hari2 Materi2
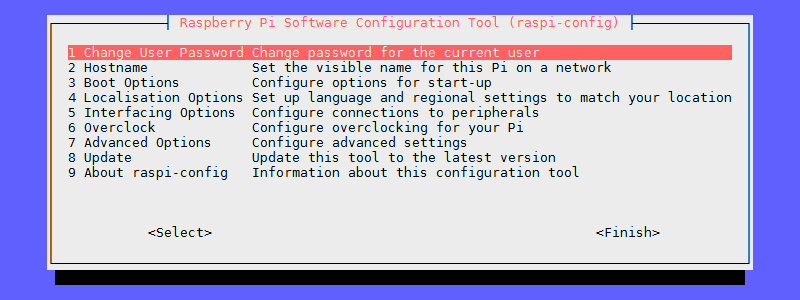
Konfigurasi hak akses
sudo raspi-config
pilih change_pass menu option & enter a new password
Konfigurasi Keyboard
By default, the Raspian image uses a English UK keyboard setup, which can lead to some confusion. For those in the US, following the following steps to fix the keyboard:
At the terminal, run
sudo raspi-config
Choose the configure_keyboard menu option
Other
English (US)
English (US) - yes, again
Additionally, if you like using the Caps Lock as Ctrl instead, run the following command:
setxkbmap -option "ctrl:nocaps"
Reboot
To make sure things are in order, reboot your RaspberryPi. This is typically only necessary if you alter the video memory setup or use the entire SD card for the Raspian setup.
sudo reboot
INTALL PYTHON
python setup.py install
ketik filenya berikut codenya lalu jalankan
python hello-world.py.
Latihan YUK:
print "Selamat Belajar Python"
print "Sukses!"
#-------------------------------------------------------
nilai = input("Nilai ujian (0-100):")
if nilai >= 60:
print "Lulus"
else:
print "Tidak lulus"
#-------------------------------------------------------
tinggi = input("Tinggi segitiga: ")
baris = 1
while baris <= tinggi:
print "*" * baris
baris = baris + 1
#-------------------------------------------------------
x = 254
print "%d" % x
print "%8d" % x
print "%10d" % x
x = -254
y = 2.4678e-4
print "Format %%i: %i" % x
print "Format %%d: %d" % x
print "Format %%o: %o" % x
print "Format %%x: %x" % x
print "Format %%X: %X" % x
print "Format %%S: %s" % x
print "Format %%e: %e" % y
print "Format %%E: %E" % y
print "Format %%f: %f" % y
print "Format %%G: %G" % y
print "Format %%g: %g" % y
print "Format %%S: %s" % y
#-------------------------------------------------------
import math
kecepatan = input("Kecepatan: ")
sudut = input("Sudut (derajat): ");
sudut = math.radians(sudut)
jarak = 2 * kecepatan * kecepatan * \
math.sin(sudut) * math.cos(sudut) / 9.8
print "Jarak = ", jarak
#-------------------------------------------------------
nilai = input("Nilai ujian (0-100): ")
if nilai >= 90:
print "A"
elif nilai >= 70:
print "B"
elif nilai >= 60:
print "C"
elif nilai >= 50:
print "D"
else:
print "E"
#-------------------------------------------------------
print "Menjumlah dua buah bilangan"
x = input("bilangan pertama: ")
y = input("bilangan kedua: ")
print "Jumlah = ", (x+y)
#-------------------------------------------------------
while True:
try:
bil = input("Masukkan bilangan: ")
break
except SyntaxError:
print("Anda salah memasukkan bilangan")
except KeyboardInterrupt:
print("\nMaaf jangan menekan tombol Ctrl+C")
print "Anda memasukkan bilangan", bil
#-------------------------------------------------------
while True:
try:
bil = input("Masukkan bilangan: ")
break
except SyntaxError:
print("Anda salah memasukkan bilangan")
print "Anda memasukkan bilangan", bil
#-------------------------------------------------------
import time
bulan = ("Januari", "Pebruari", "Maret",
"April", "Mei", "Juni",
"Juli", "Agustus", "September",
"Oktober", "Nopember", "Desember")
hari = ("Minggu", "Senin", "Selasa",
"rabu", "Kamis", "Jumat", "Sabtu")
sekarang = time.time()
infowaktu = time.localtime(sekarang)
print "Saat sekarang :"
print "Tanggal", infowaktu[2], \
bulan[infowaktu[1]-1], infowaktu[0]
print "Hari", hari[infowaktu[6]]
print "Jam", str(infowaktu[3]) + ":" + \
str(infowaktu[4]) + ":" + \
str(infowaktu[5])
#-------------------------------------------------------
def hitung_luas_lingkaran():
print "Menghitung luas lingkaran"
radius = input("Jari-jari = ")
luas = 3.14 * radius * radius
print "Luas=", luas
def hitung_luas_persegipanjang():
print "Menghitung luas persegi panjang"
panjang = input("Panjang = ")
lebar = input("Lebar = ")
luas = panjang * lebar
print "Luas=", luas
# Program utama
print "Menghitung luas"
print "1. Lingkaran"
print "2. Persegipanjang"
pilihan = input("Pilihan (1 atau 2): ")
if pilihan == 1:
hitung_luas_lingkaran()
elif pilihan == 2:
hitung_luas_persegipanjang()
else:
print "Pilihan salah"
#-------------------------------------------------------
daftar = ["1234", 2, "Edi", 1999]
jumlah = 0
for nilai in daftar:
try:
bil = int(nilai)
jumlah = jumlah + 1
except ValueError:
pass
print "Jumlah elemen berupa bilangan:", jumlah
#-------------------------------------------------------
kalimat = raw_input("Masukkan suatu kalimat: ")
jumkar = {}
for kar in kalimat:
jumkar[kar] = jumkar.get(kar,0) + 1
# Tampilkan frekuensi karakter
for kar in jumkar.keys():
if kar == " ":
print "Spasi = ",
else:
print kar, "=",
print jumkar[kar]
#-------------------------------------------------------
daftar_nama = [ "Anwar Suadi", "Ahmad Jazuli",
"Safitri", "Edi Juanedi",
"Dian Anggraeni", "Rahmat Anwari"]
dicari = raw_input("Penggalan nama yang dicari: ")
indeks = 0
ketemu = False
while indeks <= len(daftar_nama):
if dicari in daftar_nama[indeks]:
ketemu = True
break
indeks = indeks + 1
if ketemu:
print "Nama yang Anda cari cocok dengan: "
print daftar_nama[indeks]
else:
print "Tak ada yang cocok"
#-------------------------------------------------------
inp = raw_input('Enter Fahrenheit Temperature:')
fahr = float(inp)
cel = (fahr - 32.0) * 5.0 / 9.0
print cel
#-------------------------------------------------------
a = False
b = True
print ("a or b = ", a or b)
print ("a and b = ", a and b)
print ("not a = ", not a)
print ("not b = ", not b)
#-------------------------------------------------------
a = 21
b = 10
if ( a == b ):
print "Baris 1 - a sama dengan b"
else:
print "Baris 1 - a tidak sama dengan b"
if ( a != b ):
print "Baris 2 - a tidak sama dengan b"
else:
print "Baris 2 - a sama dengan b"
if ( a <> b ):
print "Baris 3 - a tidak sama dengan b"
else:
print "Baris 3 - a sama dengan b"
if ( a < b ):
print "Baris 4 - a kurang dari b"
else:
print "Baris 4 - a tidak kurang dari b"
if ( a > b ):
print "Baris 5 - a lebih dari b"
else:
print "Baris 5 - a tidak lebih dari b"
a = 5;
b = 20;
if ( a <= b ):
print "Baris 6 - a kurang dari atau sama dengan b"
else:
print "Baris 6 - a tidak kurang dari b"
if ( b >= a ):
print "Baris 7 - a lebih dari atau sama dengan b"
else:
print "Baris 7 - a tidak lebih dari b"
#-------------------------------------------------------
a = 15 # 60 = 0011 1100
b = 12 # 13 = 0000 1101
c = 0
c = a & b; # 12 = 0000 1100
print "Baris 1 - Nilai dari c adalah ", c
c = a | b; # 61 = 0011 1101
print "Baris 2 - Nilai dari c adalah ", c
c = a ^ b; # 49 = 0011 0001
print "Baris 3 - Nilai dari c adalah ", c
c = ~a; # -61 = 1100 0011
print "Baris 4 - Nilai dari c adalah ", c
c = a << 2; # 240 = 1111 0000
print "Baris 5 - Nilai dari c adalah ", c
c = a >> 2; # 15 = 0000 1111
print "Baris 6 - Nilai dari c adalah ", c
#-------------------------------------------------------
x = raw_input ('Masukkan nilai x = ')
y = raw_input ('Masukkan nilai y = ')
if x < y:
print 'x is less than y'
elif x > y:
print 'x is greater than y'
else:
print 'x and y are equal'
#-------------------------------------------------------
x = raw_input ('Masukkan nilai x = ')
y = raw_input ('Masukkan nilai y = ')
if x == y:
print 'x dan y adalah sama'
else:
if x < y:
print 'x kurang dari y'
else:
print 'x is lebih dari y'
if 0 < x:
if x < 10:
print 'x is a positive single-digit number.'
#-------------------------------------------------------
inp = raw_input('Enter Fahrenheit Temperature:')
fahr = float(inp)
cel = (fahr - 32.0) * 5.0 / 9.0
print cel
#dengan try-except
inp = raw_input('Enter Fahrenheit Temperature:')
try:
fahr = float(inp)
cel = (fahr - 32.0) * 5.0 / 9.0
print cel
except:
print 'Please enter a number'
#-------------------------------------------------------
a = raw_input('Data masukan 1 :')
b = raw_input('Data masukan 2 :')
c=max(a)
d=min(b)
print c
print d
#-------------------------------------------------------
def print_sayhello():
print "Hallo, apa kabar?"
print "Saya senang Anda dapat memiliki dan menggunkan buku kami ini."
#memanggil fungsi di sini
print_sayhello ()
#-------------------------------------------------------
def faktorial (a):
if a == 1 :
print a
return 1
else :
print a
return ( a * faktorial(a-1))
#program utama
m=raw_input ('Masukkan angka : ')
try :
x=int(m)
hasil=faktorial(x)
print "Hasil faktorial ",x," adalah ", hasil
except:
print "Data yang dimasukan salah, ulangi!"
#-------------------------------------------------------
N=raw_input ("jumlah loop N = ")
try :
m=int(N)
while m > 0 :
print m
m=m-1
print "BLASTOFF!"
except :
print "Salah entry data"
#-------------------------------------------------------
i=1
while 1:
i +=1
print i
if i == 1000:
i=0
#stop with KeyboardInterrupt: tekan CTRL C di Windwows dan CTRL Z di Raspberry
print 'selesai ...'
#-------------------------------------------------------
i=1
while 1:
i +=1
print i
if i == 1000:
break
#stop with break
print 'selesai ...'
#-------------------------------------------------------
while True:
print 'Ketik "done" untuk keluar dari loop ini'
line = raw_input('> ')
if line == 'done':
break
else :
continue
print line
print 'Done!'
#-------------------------------------------------------
temantemin = ['Edi', 'Faisal', 'Fajar']
for teman in temantemin:
print 'Selamat bekerja kawanku,', teman,' !'
print 'SELESAI!'
#-------------------------------------------------------
data = [3, 41, 12, 9, 74, 15]
count = 0
for itervar in data:
count = count + 1
print count,itervar
print 'Count: ', count
#-------------------------------------------------------
data = [3, 41, 12, 9, 74, 15]
total = 0
for itervar in data:
total = total + itervar
print total
print 'Jumlah: ', total
#-------------------------------------------------------
data = [3, 41, 12, 9, 74, 15]
total = 0
for itervar in data:
total = total + itervar
print total
print 'Jumlah: ', total
#-------------------------------------------------------
data = [3, 41, 12, 9, 74, 15]
terbesar = None
print 'Sebelum: ', terbesar
for itervar in data:
if terbesar is None or itervar > terbesar :
terbesar = itervar
print 'Loop:', itervar, terbesar
print 'Data terbesar : ', terbesar
#-------------------------------------------------------
wadah = "lp2m"
panjang = len(wadah)
firstletter=wadah[0]
lastletter=wadah[len(wadah)-1]
print "Panjang : ",len(wadah)
print "Huruf pertama : ",firstletter
print "Huruf terakhir : ",lastletter
print "Susunan letter wadah dilooping : ", "\n"
hit=0
for i in wadah :
print "Letter ke-",hit," adalah ",i
hit+=1
#-------------------------------------------------------
fruit='manggo'
index = 0
a=len(fruit)
while index < a:
letter = fruit[index]
print letter
index = index + 1
#-------------------------------------------------------
fhand = open('mbox.txt')
count = 0
for line in fhand:
count = count + 1
print 'Line Count:', count
#-------------------------------------------------------
fhand = open('pesan.txt')
inp = fhand.read()
print len(inp)
print inp[:36]
#-------------------------------------------------------
NIM=['1120329','1120330','1120332','1120333','1120335','1120336']
NAMA=['Udin Suridin','Maman Suherman','Toto Suharto','Leban Pangaribuan','Bonbon Bonjovi','Miseline Adeleide']
NOHP=['628128283344','628128281244','6281358281244','628123456789','62817582812','628535822322']
f = raw_input("Nama file tanpa extention : ")
fon = f + '.csv'
fo=open(fon,"a")
c=0
while c < 6 :
print '%s ; %20s ; %13s \n' %(NIM[c],str(NAMA[c]),str(NOHP[c]))
fo.write(str(NIM[c]) + "; " + str(NAMA[c]) + "; " + str(NOHP[c]) + "\n")
c+=1
fo.close()
def print_sayhello():
print "Hallo, apa kabar?"
print "Saya senang Anda dapat memiliki dan menggunkan buku kami ini."
#memanggil fungsi di sini
print_sayhello ()
#-------------------------------------------------------
def faktorial (a):
if a == 1 :
print a
return 1
else :
print a
return ( a * faktorial(a-1))
#program utama
m=raw_input ('Masukkan angka : ')
try :
x=int(m)
hasil=faktorial(x)
print "Hasil faktorial ",x," adalah ", hasil
except:
print "Data yang dimasukan salah, ulangi!"
#-------------------------------------------------------
def hitung_luas_lingkaran():
print "Menghitung luas lingkaran"
radius = input("Jari-jari = ")
luas = 3.14 * radius * radius
print "Luas=", luas
def hitung_luas_persegipanjang():
print "Menghitung luas persegi panjang"
panjang = input("Panjang = ")
lebar = input("Lebar = ")
luas = panjang * lebar
print "Luas=", luas
# Program utama
print "Menghitung luas"
print "1. Lingkaran"
print "2. Persegipanjang"
pilihan = input("Pilihan (1 atau 2): ")
if pilihan == 1:
hitung_luas_lingkaran()
elif pilihan == 2:
hitung_luas_persegipanjang()
else:
print "Pilihan salah"
#-------------------------------------------------------
#-------------------------------------------------------
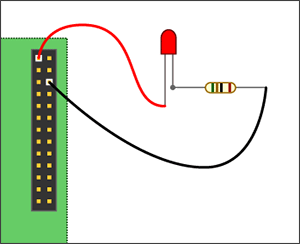
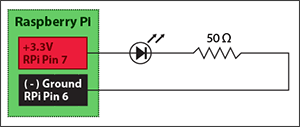
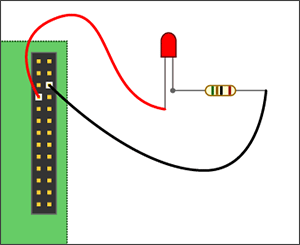
What Are The GPIO Pins on Raspberry Pi?
sudo python
import RPi.GPIO as GPIO
wget http://pypi.python.org/packages/source/R/RPi.GPIO/RPi.GPIO-0.3.1a.tar.gz
tar zxf RPi.GPIO-0.3.1a.tar.gz
cd RPi.GPIO-0.3.1a
// Install the library
sudo python setup.py install
from time import sleep
import RPi.GPIO as GPIO
GPIO.setmode(GPIO.BOARD)
GPIO.setup(16, GPIO.IN)
GPIO.setup(18, GPIO.IN)
GPIO.setup(11, GPIO.OUT)
GPIO.setup(13, GPIO.OUT)
GPIO.setup(15, GPIO.OUT)
GPIO.output(11, GPIO.LOW)
GPIO.output(13, GPIO.LOW)
GPIO.output(15, GPIO.LOW)
# state - decides what LED should be on and off
state = 0
# increment - the direction of states
inc = 1
while True:
# state toggle button is pressed
if ( GPIO.input(16) == True ):
if (inc == 1):
state = state + 1;
else:
state = state - 1;
# reached the max state, time to go back (decrement)
if (state == 3):
inc = 0
# reached the min state, go back up (increment)
elif (state == 0):
inc = 1
if (state == 1):
GPIO.output(11, GPIO.HIGH)
GPIO.output(13, GPIO.LOW)
GPIO.output(15, GPIO.LOW)
elif (state == 2):
GPIO.output(11, GPIO.HIGH)
GPIO.output(13, GPIO.HIGH)
GPIO.output(15, GPIO.LOW)
elif (state == 3):
GPIO.output(11, GPIO.HIGH)
GPIO.output(13, GPIO.HIGH)
GPIO.output(15, GPIO.HIGH)
else:
GPIO.output(11, GPIO.LOW)
GPIO.output(13, GPIO.LOW)
GPIO.output(15, GPIO.LOW)
print("pressed B1 ", state)
# reset button is pressed
if ( GPIO.input(18) == True ):
state = 0
inc = 1
GPIO.output(11, GPIO.LOW)
GPIO.output(13, GPIO.LOW)
GPIO.output(15, GPIO.LOW)
print("pressed B2 ", state)
sleep(0.2);
#-------------------------------------------------------
import smbus
from time import *
# General i2c device class so that other devices can be added easily
class i2c_device:
def __init__(self, addr, port):
self.addr = addr
self.bus = smbus.SMBus(port)
def write(self, byte):
self.bus.write_byte(self.addr, byte)
def read(self):
return self.bus.read_byte(self.addr)
def read_nbytes_data(self, data, n): # For sequential reads > 1 byte
return self.bus.read_i2c_block_data(self.addr, data, n)
class lcd:
#initializes objects and lcd
'''
Reverse Codes:
0: lower 4 bits of expander are commands bits
1: top 4 bits of expander are commands bits AND P0-4 P1-5 P2-6
2: top 4 bits of expander are commands bits AND P0-6 P1-5 P2-4
'''
def __init__(self, addr, port, reverse=0):
self.reverse = reverse
self.lcd_device = i2c_device(addr, port)
if self.reverse:
self.lcd_device.write(0x30)
self.lcd_strobe()
sleep(0.0005)
self.lcd_strobe()
sleep(0.0005)
self.lcd_strobe()
sleep(0.0005)
self.lcd_device.write(0x20)
self.lcd_strobe()
sleep(0.0005)
else:
self.lcd_device.write(0x03)
self.lcd_strobe()
sleep(0.0005)
self.lcd_strobe()
sleep(0.0005)
self.lcd_strobe()
sleep(0.0005)
self.lcd_device.write(0x02)
self.lcd_strobe()
sleep(0.0005)
self.lcd_write(0x28)
self.lcd_write(0x08)
self.lcd_write(0x01)
self.lcd_write(0x06)
self.lcd_write(0x0C)
self.lcd_write(0x0F)
# clocks EN to latch command
def lcd_strobe(self):
if self.reverse == 1:
self.lcd_device.write((self.lcd_device.read() | 0x04))
self.lcd_device.write((self.lcd_device.read() & 0xFB))
if self.reverse == 2:
self.lcd_device.write((self.lcd_device.read() | 0x01))
self.lcd_device.write((self.lcd_device.read() & 0xFE))
else:
self.lcd_device.write((self.lcd_device.read() | 0x10))
self.lcd_device.write((self.lcd_device.read() & 0xEF))
# write a command to lcd
def lcd_write(self, cmd):
if self.reverse:
self.lcd_device.write((cmd >> 4)<<4)
self.lcd_strobe()
self.lcd_device.write((cmd & 0x0F)<<4)
self.lcd_strobe()
self.lcd_device.write(0x0)
else:
self.lcd_device.write((cmd >> 4))
self.lcd_strobe()
self.lcd_device.write((cmd & 0x0F))
self.lcd_strobe()
self.lcd_device.write(0x0)
# write a character to lcd (or character rom)
def lcd_write_char(self, charvalue):
if self.reverse == 1:
self.lcd_device.write((0x01 | (charvalue >> 4)<<4))
self.lcd_strobe()
self.lcd_device.write((0x01 | (charvalue & 0x0F)<<4))
self.lcd_strobe()
self.lcd_device.write(0x0)
if self.reverse == 2:
self.lcd_device.write((0x04 | (charvalue >> 4)<<4))
self.lcd_strobe()
self.lcd_device.write((0x04 | (charvalue & 0x0F)<<4))
self.lcd_strobe()
self.lcd_device.write(0x0)
else:
self.lcd_device.write((0x40 | (charvalue >> 4)))
self.lcd_strobe()
self.lcd_device.write((0x40 | (charvalue & 0x0F)))
self.lcd_strobe()
self.lcd_device.write(0x0)
# put char function
def lcd_putc(self, char):
self.lcd_write_char(ord(char))
# put string function
def lcd_puts(self, string, line):
if line == 1:
self.lcd_write(0x80)
if line == 2:
self.lcd_write(0xC0)
if line == 3:
self.lcd_write(0x94)
if line == 4:
self.lcd_write(0xD4)
for char in string:
self.lcd_putc(char)
# clear lcd and set to home
def lcd_clear(self):
self.lcd_write(0x1)
self.lcd_write(0x2)
# add custom characters (0 - 7)
def lcd_load_custon_chars(self, fontdata):
self.lcd_device.bus.write(0x40);
for char in fontdata:
for line in char:
self.lcd_write_char(line)
#-------------------------------------------------------
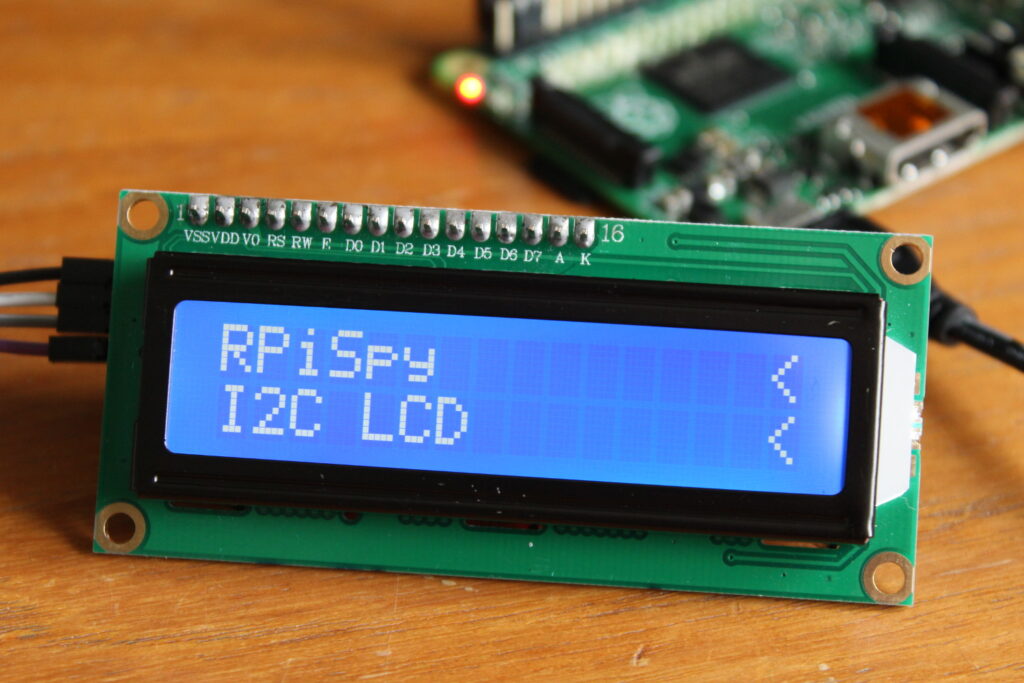
import pylcdlib
lcd = pylcdlib.lcd(0x21,0)
lcd.lcd_puts("Raspberry Pi",1) #display "Raspberry Pi" on line 1
lcd.lcd_puts(" Take a byte!",2) #display "Take a byte!" on line 2


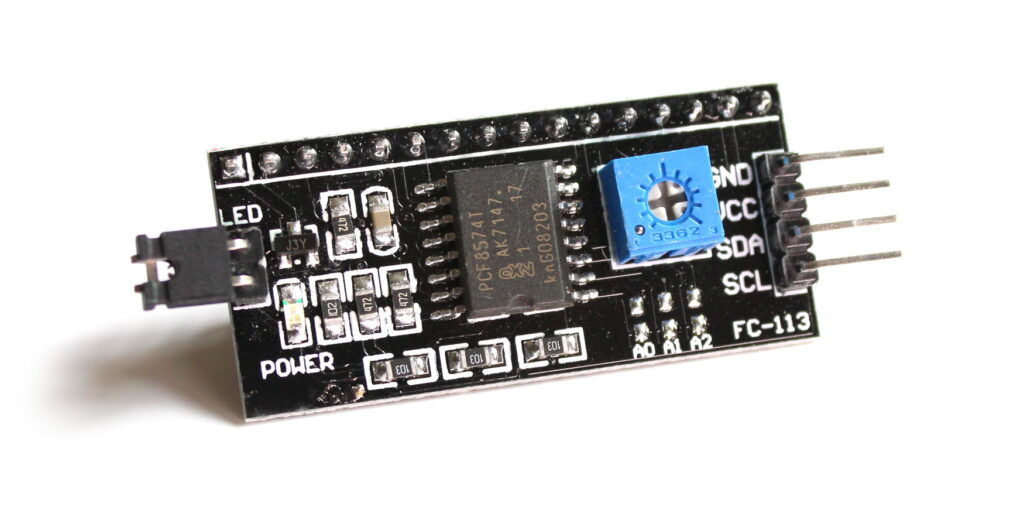

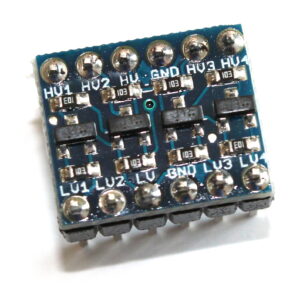 The
I2c module can be powered with either 5V or 3.3V but the screen works
best if it provided with 5V. However the Pi’s GPIO pins aren’t 5V
tolerant so the I2C signals need to be level shifted. To do this I
used an I2C level shifter.
The
I2c module can be powered with either 5V or 3.3V but the screen works
best if it provided with 5V. However the Pi’s GPIO pins aren’t 5V
tolerant so the I2C signals need to be level shifted. To do this I
used an I2C level shifter.