I2C is a multi-device bus used to connect low-speed peripherals to computers and embedded systems. The Raspberry Pi supports this interface on its GPIO header and it is a great way to connect sensors and devices. Once configured you can connect more than one device without using up additional pins on the header.
Before using I2C it needs to be configured. This technique has changed slightly with the latest version of Raspbian so I’ve updated this article.
Step 1 – Enable i2c using raspi-config utility
From the command line type :
sudo raspi-config
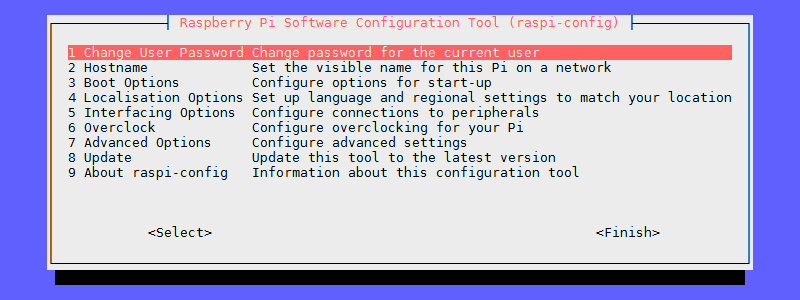
This will launch the raspi-config utility.
Now complete the following steps :
- Select “Advanced Options”
- Select “I2C”
The screen will ask if you want the ARM I2C interface to be enabled :
- Select “Yes”
- Select “Ok”
- Select “Finish” to return to the command line
When you next reboot the I2C module will be loaded.
Step 2 – Install Utilities
To help debugging and allow the i2c interface to be used within Python we can install “python-smbus” and “i2c-tools” :
sudo apt-get update
sudo apt-get install -y python-smbus i2c-tools
Step 3 – Shutdown
Shutdown your Pi using :
sudo halt
Wait ten seconds, disconnect the power to your Pi and you are now ready to connect your I2C hardware.
Checking If I2C Is Enabled (Optional)
When you power up or reboot your Pi you can check the i2c module is running by using the following command :
lsmod | grep i2c_
That will list all the modules starting with “i2c_”. If it lists “i2c_bcm2708” then the module is running correctly.
Testing Hardware (Optional)
Once you’ve connected your hardware double check the wiring. Make sure 3.3V is going to the correct pins and you’ve got not short circuits. Power up the Pi and wait for it to boot.
If you’ve got a Model A, B Rev 2 or B+ Pi then type the following command :
sudo i2cdetect -y 1
If you’ve got an original Model B Rev 1 Pi then type the following command :
sudo i2cdetect -y 0
Why the difference? Between the Rev 1 and Rev 2 versions of the Pi they changed the signals that went to Pin 3 and Pin 5 on the GPIO header. This changed the device number that needs to be used with I2C from 0 to 1.
I used a Pi 2 Model B with a sensor connected and my output looked like this :
pi@raspberrypi ~ $ sudo i2cdetect -y 1
     0  1  2  3  4  5  6  7  8  9  a  b  c  d  e  f
00:          -- -- -- -- -- -- -- -- -- -- -- -- --
10: -- -- -- -- -- -- -- -- -- -- -- -- -- -- -- --
20: 20 -- -- -- -- -- -- -- -- -- -- -- -- -- -- --
30: -- -- -- -- -- -- -- -- -- -- -- -- -- -- -- --
40: -- -- -- -- -- -- -- -- -- -- -- -- -- -- -- --
50: -- -- -- -- -- -- -- -- -- -- -- -- -- -- -- --
60: -- -- -- -- -- -- -- -- -- -- -- -- -- -- -- --
70: -- -- -- -- -- -- -- --
This shows that I’ve got one device connected and its address is 0x20 (32 in decimal).


Tidak ada komentar:
Posting Komentar